
Procedural dungeons
Introduction
Procedural generation is a popular topic in games. The ability to use randomness constrained with rules to make an almost infinite amount of interesting and cool gameplay features is something many people strive for. Dungeon generation is a popular use case for procedural content. Games like The Binding of Isaac, Enter the Gungeon, Dead Cells and many more use some form of dungeon generation. My approach to dungeon generation is based on randomly placed points in space, which are triangulated and formed into a dungeon layout. Which goes something like this: Points -> Triangulation -> MST -> Gameplay additions.
Motivation
I have been a long time fan of roguelike games and have played all previous games a great amount. So seeing that I had the time to do a self study I wanted to work on this exact topic. The process of generating dungeons is inspired by a simple thought process of how one could end up at a playable dungeon. My main goal in this project was to create a small tool which could be easily embedded on a code level and leveraged to make dungeon prototypes in a graph structure for users.
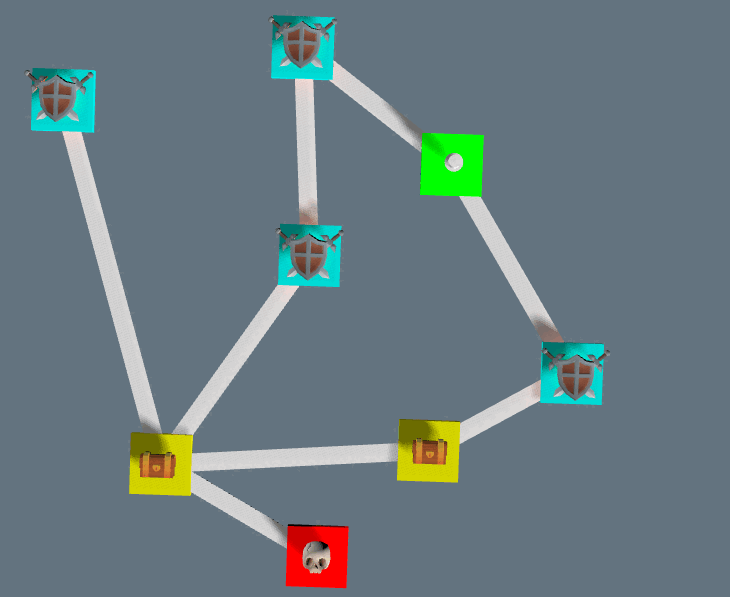
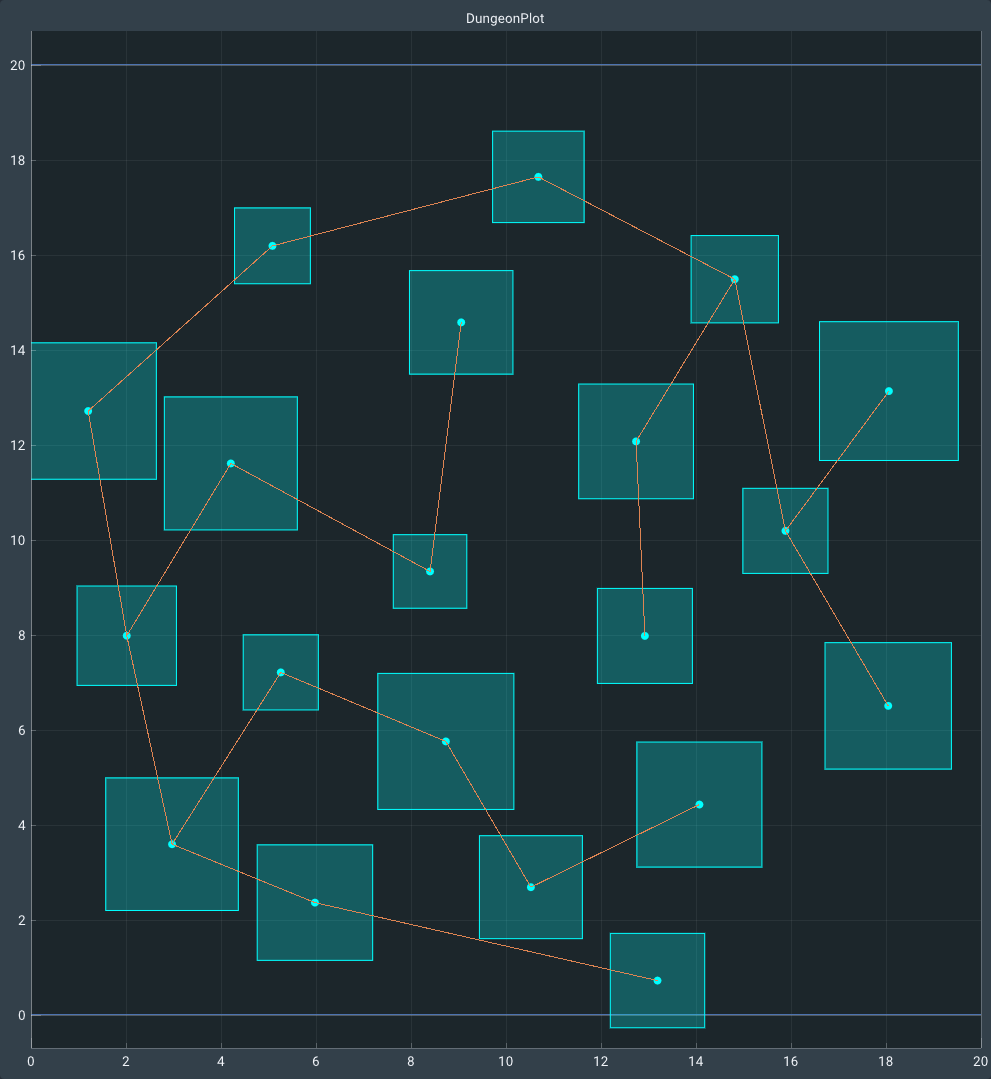
Final result:
Generation in other games and comparison to industry standard
Current industry standard games have complex algorithms tied to gameplay constraints set up by designers.
My library instead serves as a springboard for programmers or technical designers that want to get their hands dirty in making a dungeon layout using graphs.
The games that I mentioned previously have complex rules and constraints. Dead Cells and Enter the Gungeon design the flow of the level first as a directed graph with vertices containing information what the room type is. They then place randomly selected rooms from the pool for that room type. These approaches to dungeon generation are fully fletched and have seen a lot of design work.
The Binding of Isaac is an interesting exception as it using a unique algorithm where placing rooms is done with expansion of the level. But it has constraints which make sure that special level pieces have a place to go. Which is done by ensuring dead-ends are being generated.
These approaches to dungeon generation vary greatly from my library but are very interesting, I have included links at the end of this blogpost.
Dungeon generation
The dungeon generation process consists of 5 steps:
- Generating points
- Triangulating points
- Minimum spanning tree
- Room types
- Converting to a level
The generation process uses random numbers which are generated by a random engine. This allows the generation process to be deterministic.
Step 1: Point generation
In this first step points will be generated in 2D space. I used Poisson disc sampling to generate points because it places rooms at a minimum distance from eachother. Which avoids having to separate rooms by physics simulation.
The points generated will be the locations for the rooms of the dungeon. I have given the vertices a random scale for variety.
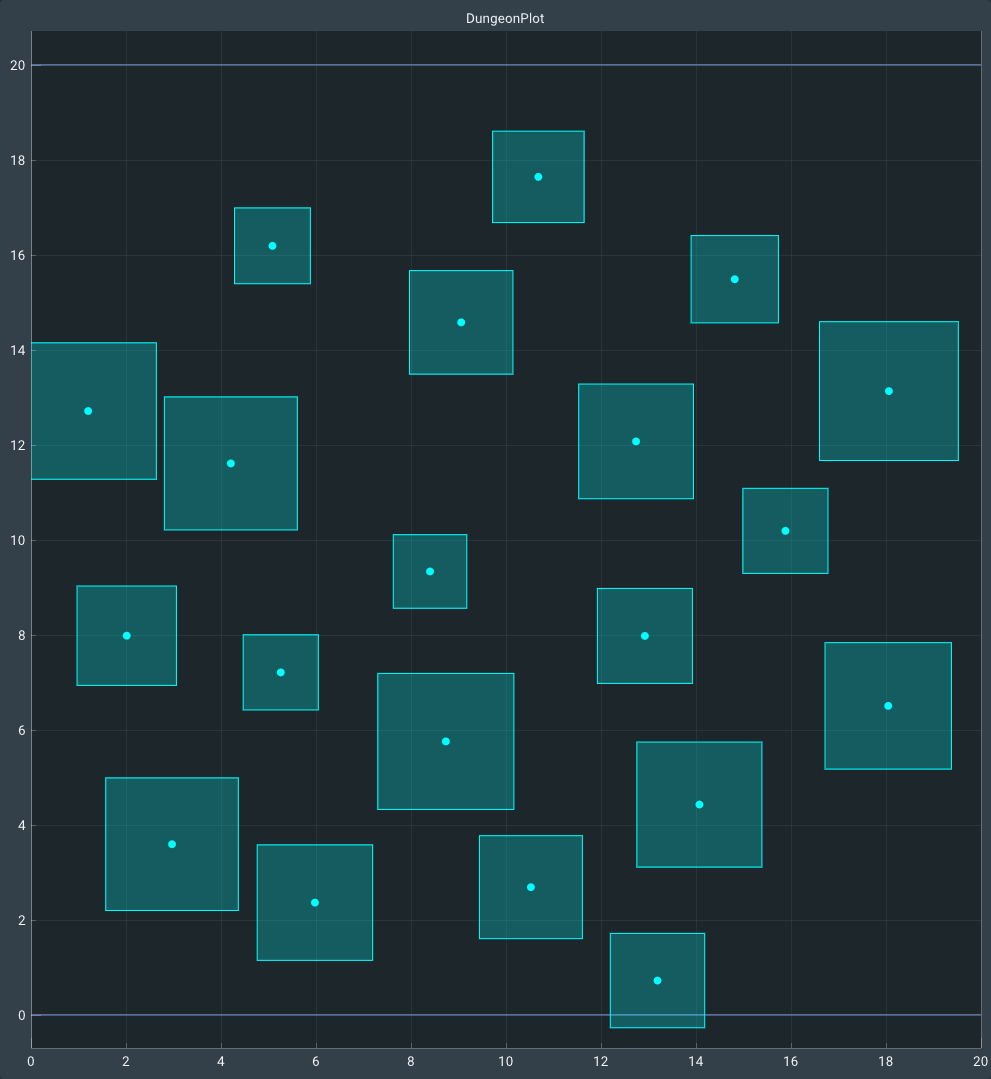
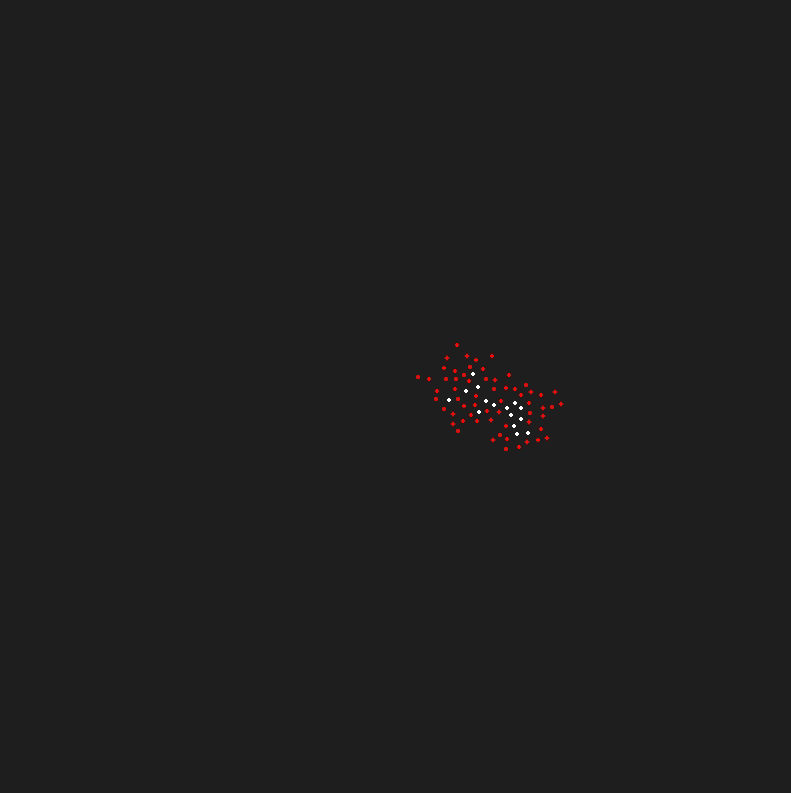
Visualization of poisson disc sampling by mujtaba on gamedia
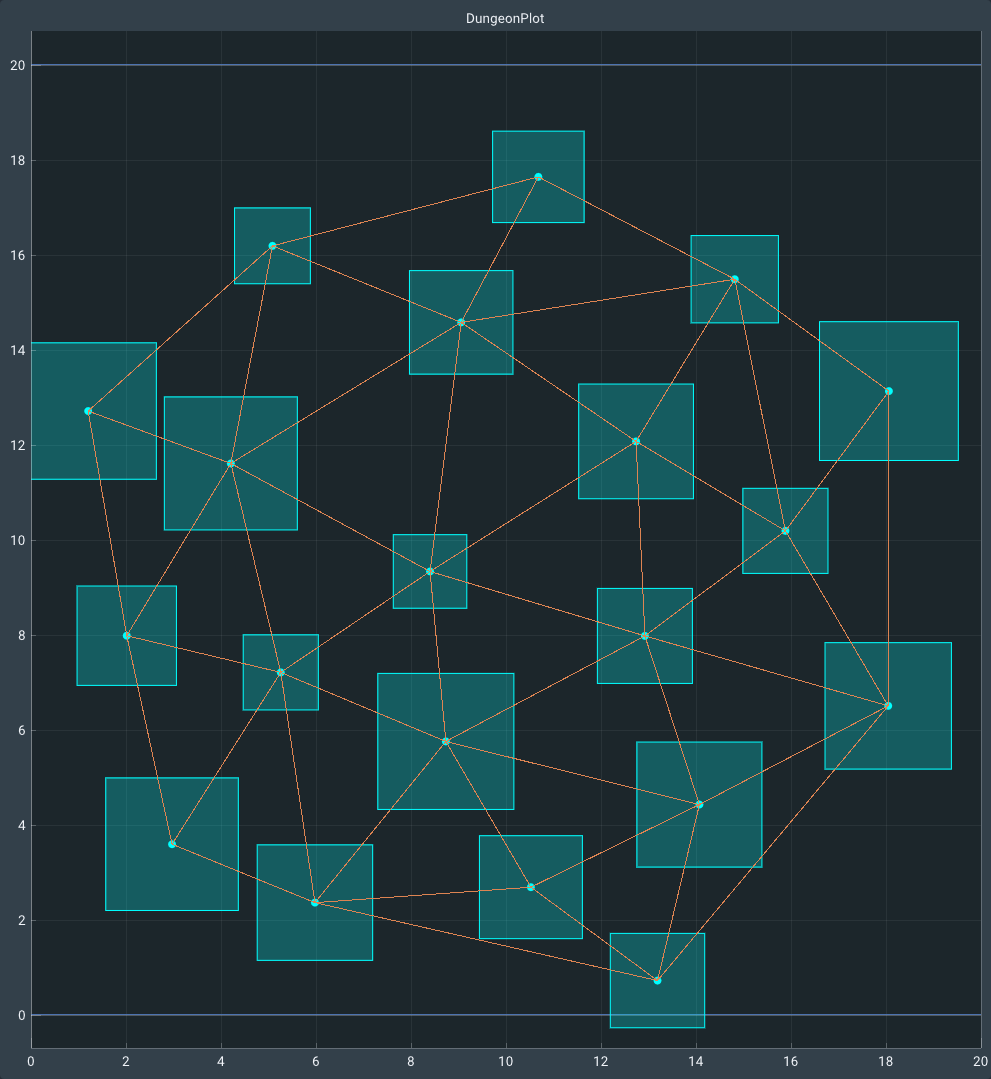
Step 2: Triangulation
In the second step, I use Delaunay triangulation to connect all neighboring vertices. I chose for Delaunay triangulation mainly because it avoids generating sliver triangles. Which are triangles with 2 extremely acute angles. There are plenty of good implementations out there, which is why I decided to use the Delaunator library. Which provides me with a robust and efficient triangulation implementation.
Complexity
The complexity of this Delaunay implementation is O(n log(n)) as it is based on a sweep-line, sweep-hull idea. Read more about it on their github
My usage of this library speed up generation considerably as even in very big graph this step stays very performant.
Step 3: Minimum Spanning Tree (MST)
In this third step I use a minimum spanning tree to find the subset of the graph generated by Delaunay triangulation with the lowest total weight. The contains all vertices but no cycles from the original graph.
I implemented Prim’s MST algorithm, this is a greedy algorithm and considers all options to expand at every step until it has visited every vertex. And because I know that my graph is connected because of the previous triangulation step it will create the minimum spanning tree.
Explanation of the algorithm:
1. Add an arbitrary first edge to the priority queue
2. For every unvisited edge with an unvisited target vertex in the priority queue
    2.1. Add the vertex target vertex of the edge to the graph and mark it as visited
    2.2. Add the edge to the graph with parent and target
    2.2. For every edge in the vertex add edges with unvisited targets to the priority queue and sort it

By Shiyu Ji - Own work, CC BY-SA 4.0, Link
Implementation
// 0: weight
// 1: connected to
// 2: parent
// std::greater<> sort the queue and makes the smallest element appear as the top
std::priority_queue<std::tuple<uint32_t, uint32_t, uint32_t>, std::vector<std::tuple<uint32_t, uint32_t, uint32_t>>, std::greater<>> pq;

// Vector of vertices we haven't visited yet
std::vector<bool> visited(vertices.size(), false);

// Add the first edge, weight: 0, vertex: 0, parent: (no parent so INT_MAX)
pq.emplace(0, 0, std::numeric_limits<uint32_t>().max());

// Keep going until we have visited all edges added to the queue
while(!pq.empty())
{
    // Get the edge with the lowest weight and then pop it from the queue
    auto [wt, u, parent] = pq.top();
    pq.pop();

    if (visited[u] == true) {
        continue;
    }

    visited[u] = true;

    // Add the edge to the edges
    // And update the adjacency lists for the related vertices
    if (parent != std::numeric_limits<uint32_t>().max()) {
        mstEdges.emplace_back(parent, u);
        vertices[u].mConnections.emplace_back(parent);
        vertices[parent].mConnections.emplace_back(u);
    }

    // Add edges that connect to not yet visited vertices to the priority queue
    for (auto v : adjacent[u]) {
        if (visited[v[0]] == false) {
            pq.emplace(v[1], v[0], u);
        }
    }
}
Complexity
The complexity of this algorithm is O((E+V)*log(V)) where E is the edges in the original graph and V is the vertices.
This speed is achieved by the priority queue being sorted at all times. Allowing the algorithm to always pick the edge with the lowest weight instead of having to find it in all possible edges.
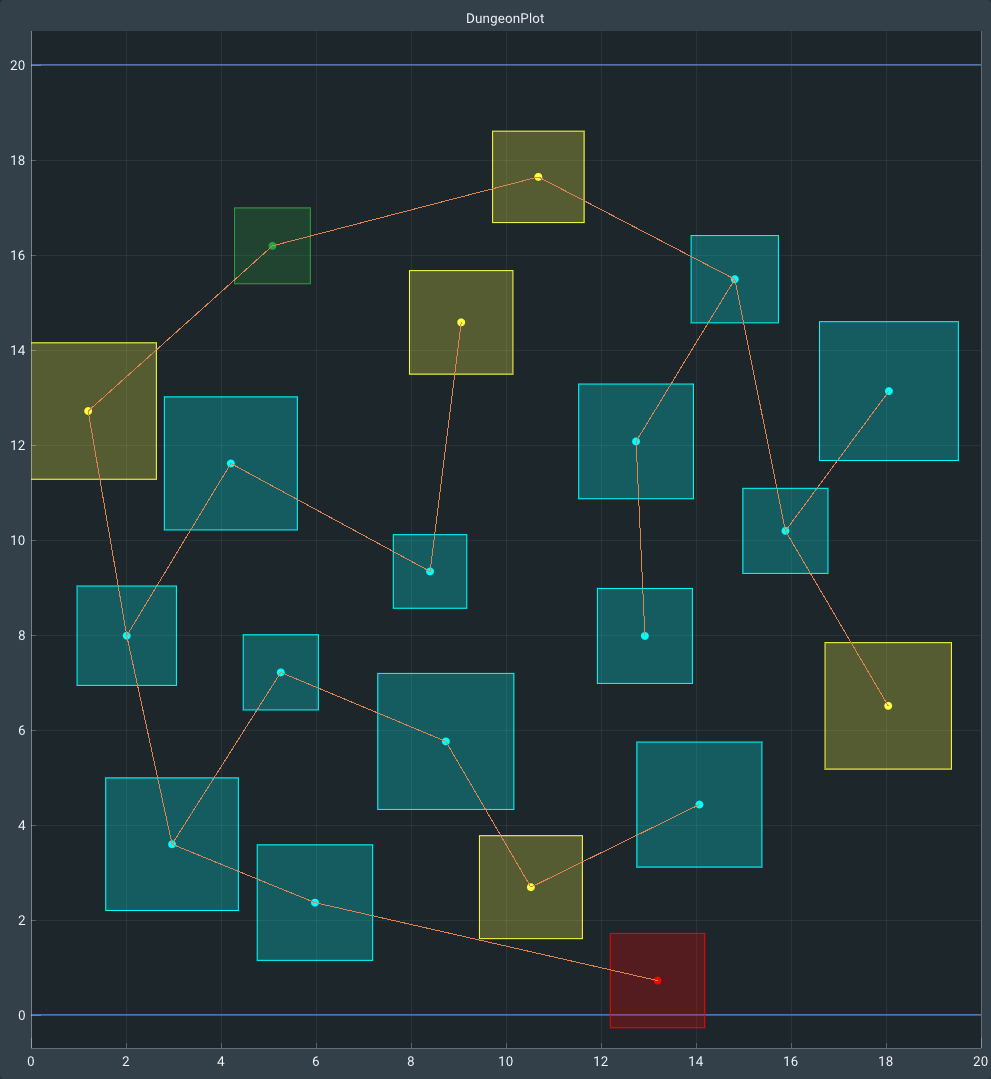
Step 4: Room types
Step 4 is an optional step which the user can disable. But it performs a quick assignment of room types for the dungeon rooms. The way this is done is by looping over all vertices in the graph and setting their type with a random number and a threshold. The start and boss room are placed at each end of the graph.
Example room distribution used in my demo.
enum class RoomTypes
{
    START,
    BOSS,
    ENEMY,
    TREASURE,
    NUM_TYPES,
};

for (auto& room : vertices)
{
    float roomType = roomTypeDist(typeGen);

    // Set the room type depending on value generated
    room.mType = roomType < treasureRoomPercentage ? RoomTypes::TREASURE : RoomTypes::ENEMY;
}

vertices.front().mType = RoomTypes::START; // Set first vertex to start
vertices.back().mType = RoomTypes::BOSS; // Set last vertex to boss
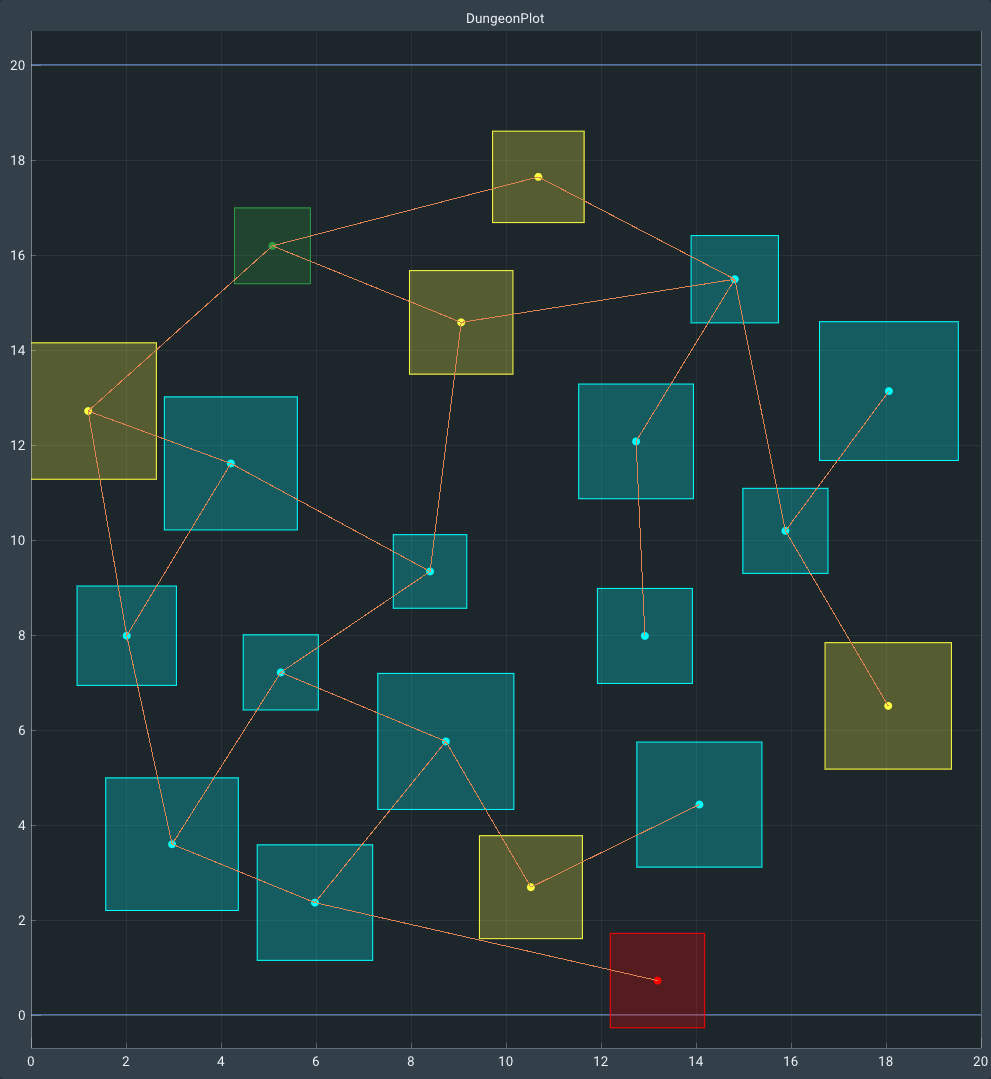
Step 5: Adding edges
In this step I add extra edges to the graph as there would otherwise be no cycles making the dungeon boring and very backtrack heavy. I do this by adding back some of the previously removed Delaunay edges.
1. For requested number of extra edges
    1.1. Get a random edge from the Delaunay set
    1.2. Verify that this edge does not exist in the dungeon already
    1.3. Add the edge and update the adjacency list of the rooms
Step 6: Room and Corridor placement
This is the last step and also optional. It turn the vertices and edge into a level. I used Coral Engine as it was easy to develop with. The demo contains a user interface where prefabs can be selected per room type.
The basic steps go like this.
1. For each vertex
    1.1. Select the correct prefab depending on the room type of the vertex
    1.2. Place the selected prefab in the world at vertex location
    1.3. Scale the prefab according to scale

2. For each edge
    2.1 Place the user selected corridor prefab at the mid point of the vertices linked to the edge
    2.2 Orient the prefab in the direction of either vertex
    2.3 Scale the prefab to connect both vertices nicely
Multiple examples of dungeons generated:

Variations
The generation can be tweaked depending on a multitude of variables (E.g. vertex count, extra edges count, seed, generation shape, gameplay specifications, user specified prefabs).
Usage
The code for this project can be found on my github. The relevant code is contained in the Dungeonerator folder which can be built using CMake. An example to use the interface shown in the ReadMe.md.
Generation settings:
- Vertex count: The amount of vertices to be generated
- Extra edge count: The amount of extra edges to be added after creating the MST.
- Vertex size range: The range in which the vertex sizes will lie.
- Dungeon size: The dimensions of how the dungeon
- Seed: Sets the seed for the generator. Which should only be positive.
- IsCircle: Whether the Poisson disk generator should generate points over a circle or rectangle.
- Generate Gameplay Content: Wether vertices should have a room type
- Treasure Room Percentage: What percentage of room should be a treasure room. From none 0.0 to 1.0 all.
Usage in C++:
#include "dungeonerator.hpp"

int main() {
  DungeonGenerator::GenerationData generationData(30, 5, 1.0, {1.0f, 1.0f}, {100.0f, 100.0f}, false, true, 0.3f);
  DungeonGenerator::Dungeon myDungeon(generationData);

  return 0;
}
Possible expansions
The application can run fast enough to generate dungeon that the user might want. A dungeon of ~70000 vertices can be generated in a second. There is still room for improvement on performance with generating points as it takes up 75% of the execution time. Adding other ways to generate points would give the user more control over how they want their dungeon to look like. By using a random uniform distribution of points or using a Halton sequence.
In Addition to this, more options for customizing the dungeon could be added. A lock and key system or generating points over a density map. Or to generate elbow shaped or spline corridors.
And lastly adding an option for 3D dungeon design as the current implementation is fully 2 dimensional.
Final Thoughts
I loved working on this project, as it is something that fascinates me. Procedural generation has many applications and even more variations.
This project has taught me a lot when it comes to graphs, and algorithms to work with graphs.
In conclusion, with further development this tool can become even greater and add more functionality for designers.
Reference and Further Reading
Games mentioned previously
Binding of Isaac - Bindong of Isaac wiki
Enter the Gungeon - boristhebrave.com